Table of Contents
- What is a VNA?
- NanoVNA variants
- Typical applications
- 1. Antenna measurement
- 2. Filter measurement
- 3. Cable measurement
- 4. Balun and unun testing
- Calibration: the most important step
- Software and PC connection
- Practical tips
- Limitations of the NanoVNA
- NanoVNA for SOTA and portable operation
- What else you need
- Videos: NanoVNA in Practice
- NanoVNA from Zero — Antenna Measurement in Under 19 Minutes
- W2AEW: Why a VNA Needs to Be Calibrated
- Sources and Further Reading
- Transparency Notice
Just ten years ago, a usable vector network analyser cost several thousand euros. Today there is the NanoVNA — a device the size of a credit card that delivers astonishingly accurate measurements for under 50 euros. For radio amateurs it has become an indispensable tool.
What is a VNA?
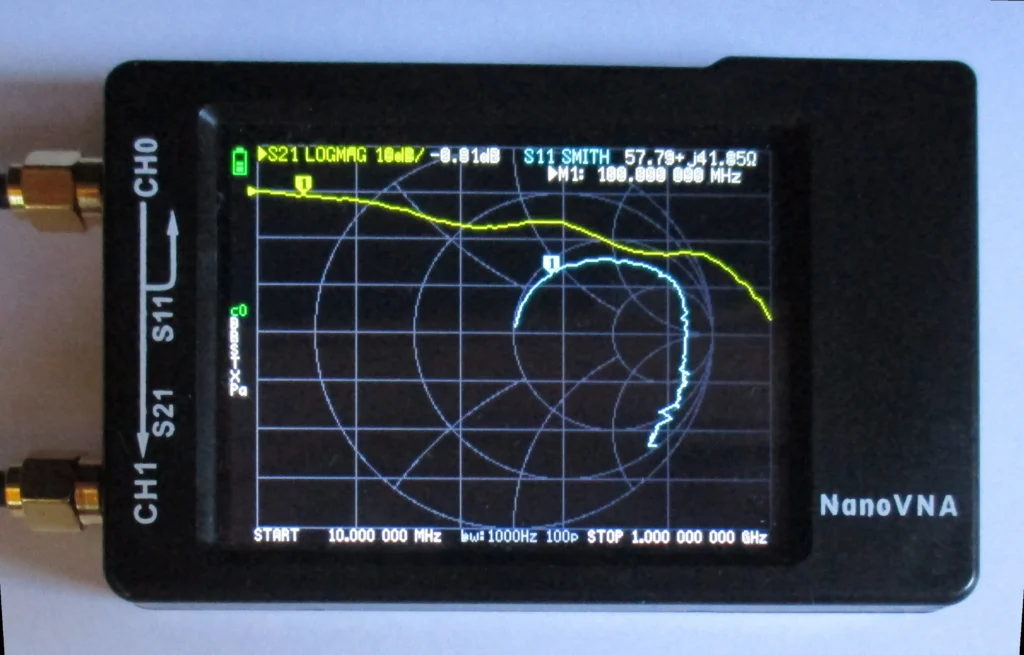
A vector network analyser (VNA) measures both the amplitude and the phase of a signal. Unlike a simple SWR meter that only displays the standing wave ratio, a VNA provides complete impedance data. You see not only whether an antenna is resonant, but also the exact impedance curve across a frequency range — displayed as a Smith chart, SWR curve or impedance plot.
NanoVNA variants
Since the original NanoVNA design, a whole family of devices has emerged:
- NanoVNA (original, edy555): 50 kHz to 300 MHz, small 2.8-inch display (320×240). The ancestor of all budget VNAs — the open-source design on which all later variants are based.
- NanoVNA-H (hugen79): Extends the frequency range to 10 kHz – 1.5 GHz using harmonics of the SI5351 oscillator. More stable hardware with metal shielding, built-in LiPo battery and better power management. The best-selling model — from approx. 30–50 EUR.
- NanoVNA-H4: With a 4-inch display — considerably easier to read.
- NanoVNA V2 (S-A-A-2): Completely new FPGA-based mixer design. Frequency range 50 kHz – 3 GHz. The V2 Plus4 variant offers a 4-inch display and is usable up to ~4.4 GHz. Ideal for UHF applications. From approx. 100–250 EUR depending on version.
- LiteVNA-64: Newer variant with USB-C, 4-inch display and a frequency range up to 6.3 GHz. Dynamic range over 90 dB (calibrated, below 3 GHz). 2000 mAh battery. From approx. 175 EUR.
- NanoVNA-F V2 (Chelegance): The "pro model" among NanoVNAs: 50 kHz – 3 GHz, large 4.3-inch IPS display (800×480), aluminium enclosure and a 5000 mAh battery for up to 7 hours runtime. From approx. 250 EUR.
For most amateur radio applications (antennas on HF, 2 m and 70 cm) a NanoVNA-H or NanoVNA-H4 is more than sufficient.
⚠️ Beware of clones: The market is flooded with cheap counterfeits advertising exaggerated specs. Above 1 GHz, many clones' measurements deteriorate dramatically. For reliable measurements, buy from trusted sources — e.g. directly via Tindie (NanoRFE) or Chelegance.
Typical applications
1. Antenna measurement
The most common application: measuring the SWR and impedance of an antenna. How deep is the resonance? How broadband is the antenna? Is the resonant frequency where it should be? The NanoVNA shows all this in a fraction of a second.
Especially when building antennas yourself — EFHWs, dipoles, verticals — the NanoVNA is invaluable. Instead of working on the "cut and hope" principle, you can tune the antenna in real time.
2. Filter measurement
Band-pass filters, low-pass filters and duplexers can be characterised with the NanoVNA. You see the passband curve, the roll-off steepness and the insertion loss at a glance.
3. Cable measurement
Using the TDR function (Time Domain Reflectometry), you can determine cable lengths and locate faults. Where is the kink? Where is the short circuit? The NanoVNA shows it.
4. Balun and unun testing
Home-wound baluns and ununs can be checked for their impedance transformation and bandwidth — before hanging them on the antenna.
Calibration: the most important step
No measurement without calibration. The NanoVNA comes with three calibration standards: Open, Short and Load (50 ohm termination). Before every measurement you should calibrate — at the end of the measurement cable, not at the device itself.
Calibration compensates for the losses and phase shifts of the cable and connectors. Without calibration, the measurements are useless. A common beginner mistake: using the supplied cable and calibrating at the device port. Better: use a good SMA cable and calibrate at the end of the cable (where the antenna will be connected).
Software and PC connection
The NanoVNA can also be controlled from a PC. The most popular programs:
- NanoVNA Saver: Open-source software (Python) for Windows, macOS and Linux. Offers Smith chart, SWR curves, data export and advanced analysis features. The community standard — current version 0.7.x.
- NanoVNA App (Android): Controls the NanoVNA via USB OTG directly from a smartphone. Handy for field measurements.
- NanoVNA-QT: Alternative desktop software with a similar feature set.
Via PC software you can save, compare and export measurements. The display on a large screen is naturally far more comfortable than the small NanoVNA screen.
Practical tips
- Always calibrate: Recalibrate before every measurement session, especially if the cable or temperature has changed.
- Use good cables: Cheap SMA cables can distort results. Use short, high-quality cables.
- Charge the battery: The built-in LiPo battery lasts several hours. Bring a power bank for long sessions.
- Update firmware: The community continuously improves the firmware. For NanoVNA-H/H4, the DiSlord firmware (NanoVNA-D) is the best choice — offering improved calibration, auto-scaling and extended analysis features.
- Understand the Smith chart: If you can read the Smith chart, you get significantly more from the NanoVNA. It is worth studying.
- Get a protective case: The NanoVNA is fragile. A silicone sleeve or 3D-printed case protects the display and connectors.
Limitations of the NanoVNA
For all the enthusiasm — the NanoVNA is no substitute for a professional laboratory instrument. Its limitations include:
- Dynamic range: About 70 dB on the budget models. Professional VNAs offer 100+ dB. For filter measurements with high stopband rejection, this may not always suffice.
- Accuracy: Sufficient for amateur radio purposes, but not laboratory-grade. SWR values below 1.1 should be taken with a pinch of salt.
- Frequency stability: For very precise measurements, frequency stability can be a factor.
- Power: Only suitable for passive measurements. Never connect the NanoVNA to an active transmitter — it will destroy it.
Despite these limitations: for what a radio amateur needs day to day — tuning antennas, checking cables, testing filters — the NanoVNA is more than adequate.
NanoVNA for SOTA and portable operation
The NanoVNA is ideal for portable operation. If you set up an antenna on a mountain — be it a SOTA activation or in a park for POTA — you can tune it on site, no guesswork needed. Trim the wire radiator of an EFHW until the resonance sits on the desired frequency. Or quickly check the SWR before your first CQ call. Weighing under 100 grams, the NanoVNA is barely noticeable in a rucksack.
What else you need
Besides the NanoVNA itself, a few accessories are useful:
- SMA calibration kit: The supplied kit is often mediocre quality. A better kit noticeably improves measurement accuracy.
- SMA adapters: SMA to SO-239 (UHF female), SMA to BNC, SMA to N — depending on your antenna and setup.
- Short, good SMA cables: 20-30 cm, as low-loss as possible.
- USB-C cable: For firmware updates and PC control.
The NanoVNA has democratised access to professional measurement technology. What once cost thousands of euros now fits in your pocket for less than the price of a dinner. Anyone who is serious about antennas — whether building, tuning or troubleshooting — can hardly do without this little marvel.
73 – your oeradio.at editorial team
Videos: NanoVNA in Practice
These videos show setup, calibration and practical measurements with the NanoVNA:
NanoVNA from Zero — Antenna Measurement in Under 19 Minutes
W2AEW: Why a VNA Needs to Be Calibrated
Sources and Further Reading
- nanovna.com — Official NanoVNA website
- GitHub: ttrftech/NanoVNA — Original firmware (edy555)
- GitHub: DiSlord/NanoVNA-D — Community firmware for NanoVNA-H/H4
- GitHub: NanoVNA-Saver — Open-source PC software (Python)
- NanoRFE: NanoVNA V2 — Official V2 website
- Chelegance — NanoVNA-F V2 manufacturer
- nVhelp — NanoVNA documentation & user guide
- NanoVNA Users Group — Community forum (groups.io)
Transparency Notice
This article was researched and written with the assistance of AI (Claude, Anthropic). Any illustrations used were generated with AI (ChatGPT/DALL·E, OpenAI) unless otherwise noted. The editorial team has reviewed and edited all content. Despite careful review, occasional inaccuracies may occur — we welcome corrections via email to [email protected].
Not a radio amateur yet? Our article Becoming a Radio Amateur – Getting Started Is Easier Than You Think shows you how to get your licence.