
What’s This About?
If you want to control your IC-705 remotely – from the office, a second QTH, or on vacation – the built-in Wi-Fi function and software like wfview on PC or SDR Mobile on iPhone/iPad provide a solid foundation. On the local network, this works without issues. But as soon as you want to access it over the internet, things get more interesting.
If your ISP provides a public IPv4 and you can set up port forwarding, you’re all set. You don’t really need this article. But many ISPs – mine here in Carinthia, for example – use CGNAT. That means you share a public IP with other customers, and port forwarding is simply not possible.
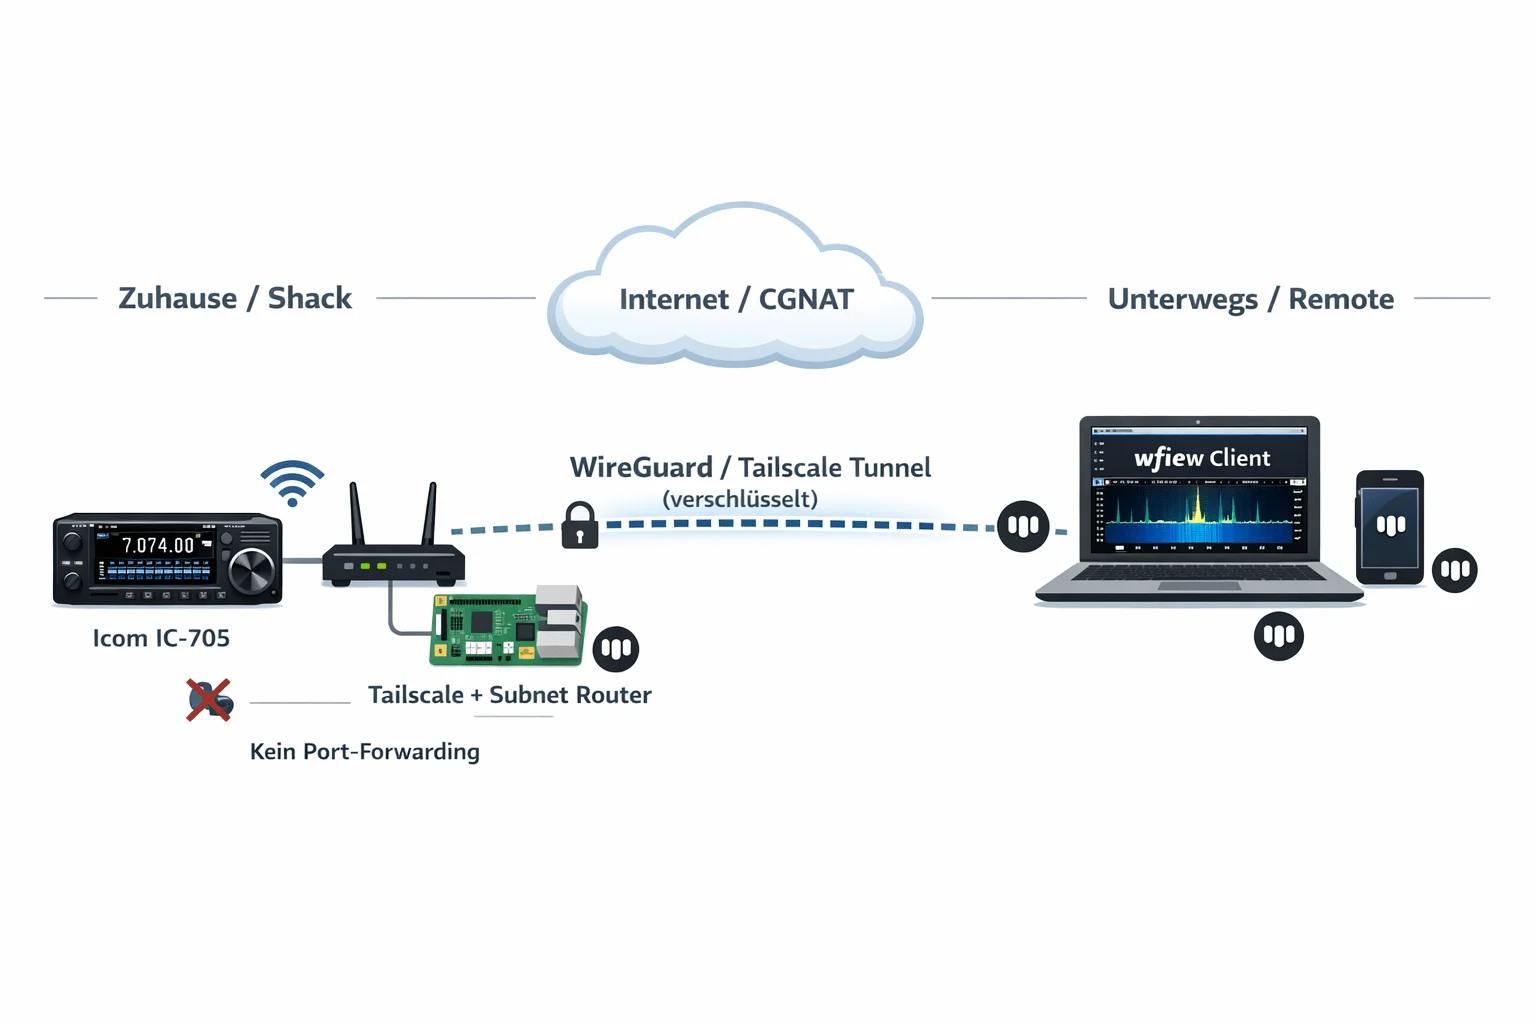
There are several ways to solve this. You can set up a VPS with WireGuard, use ZeroTier, or – if you only need TCP – even use Cloudflare Tunnel. All valid approaches with different pros and cons. In this article, I’ll show one of these methods: Tailscale on a Raspberry Pi as a subnet router. Not because it’s the only way, but because it’s the one that worked most smoothly for me. On the client side, I’ll demonstrate the setup with wfview (PC/Mac/Linux) and SDR Mobile (iOS) – both work flawlessly over the tunnel.
Quick Overview: The Options
Before we dive into the Tailscale guide, here’s an honest comparison of the common solutions. The IC-705 communicates via UDP on ports 50001-50003 (Control, CI-V Serial, Audio) – this is an important factor in the choice:
| Solution | UDP Support | CGNAT-capable | Setup Effort | Cost |
|---|---|---|---|---|
| Tailscale | ✅ Native | ✅ Automatic | Low | Free |
| WireGuard + VPS | ✅ Native | ✅ (VPS has public IP) | High | ~5€/month |
| ZeroTier | ✅ Native | ✅ | Medium | Free (25 devices) |
| Cloudflare Tunnel | ❌ TCP/HTTP only | ✅ | Medium | Free |
| Port Forwarding + DynDNS | ✅ | ❌ Needs public IP | Low | Free |
Cloudflare Tunnel is out for the IC-705 because it doesn’t support UDP. ZeroTier is a real alternative to Tailscale and works on a similar principle. WireGuard on your own VPS gives you the most control but also requires the most maintenance. And if you have a public IP, you can get there with port forwarding and DynDNS – though you should think about security.
There are also alternatives to the Raspberry Pi as a gateway. Any Linux machine, an old mini PC, a NAS that can run Docker or Tailscale, even a Windows PC – all possible. The Pi is just compact, power-efficient, and affordable, which is why I use it as an example here.
What is Tailscale?
Tailscale is an overlay network based on WireGuard. It creates a virtual network (“Tailnet”) between your devices. Laptop, Raspberry Pi, phone – they see each other as if they were on the same LAN. The data flows directly between devices (peer-to-peer); Tailscale itself only facilitates the connection setup.
What makes it interesting for our use case:
- NAT Traversal: Works automatically behind CGNAT, double NAT, firewalls, and mobile data. In most cases, a direct connection is established.
- Native UDP: Important for the IC-705 control ports.
- Subnet Router: The IC-705 doesn’t need Tailscale – only the Pi (or another computer) on the same network. It forwards the traffic, and the IC-705 doesn’t notice anything.
- Free for up to 3 users and 100 devices.
- No server needed, no DynDNS, no port forwarding.
Latency is usually low enough for SSB QSOs and FT8. For me, in peer-to-peer mode, it’s typically single-digit milliseconds.
What You Need
- Icom IC-705 with current firmware, Wi-Fi configured (Station Mode)
- Raspberry Pi (or another Linux machine) – connected via Ethernet to the router. Even a Pi 2 is sufficient, though the waterfall in wfview might be a bit choppy.
- Tailscale account – free, login via Google, GitHub, Microsoft, or Apple.
- wfview on your client (Windows, Mac, Linux) – free and open source.
- And/or SDR Mobile on iPhone or iPad – available in the App Store, supports the IC-705 natively over the network.
- Optional: Tailscale on your smartphone for mobile access.
Step 1: Configure the IC-705 for Network
If you’re already controlling your IC-705 via Wi-Fi with wfview on the local network, you can skip ahead. For everyone else:
On the IC-705, press MENU and navigate to Set → WLAN Set. The IC-705 must be in Station Mode – it connects to your Wi-Fi, not the other way around. Select the network, enter the password, done. You can find the IP address under WLAN Set → WLAN Information. It’s best to assign a fixed IP via DHCP reservation in the router so it doesn’t change. Mine is 192.168.1.50.
Then the Remote Settings:
- Network Control: ON
- Control Port (UDP): 50001 (default)
- Serial Port (UDP): 50002
- Audio Port (UDP): 50003
- Internet Access Line: FTTH (or whatever fits your setup)
Under Network User1, create a user with username and password. Set Administrator to YES. And under Set → Connectors → CI-V, set CI-V Transceive to ON.
That’s it for the IC-705.
Step 2: Tailscale on the Raspberry Pi
The Pi is set up as a subnet router. It sits on the same network as the IC-705 and forwards Tailscale traffic to the local network. Connect it via Ethernet to the router – that’s more stable than Wi-Fi.
I’m assuming Raspberry Pi OS here. Connect via SSH and install Tailscale:
curl -fsSL https://tailscale.com/install.sh | shThen start Tailscale and advertise the subnet:
sudo tailscale up --advertise-routes=192.168.1.0/24192.168.1.0/24 with your actual subnet! FritzBox users typically have 192.168.178.0/24, for 10.0.0.x use 10.0.0.0/24 accordingly.The command outputs a link that you open in the browser to authorize the Pi.
Enable IP forwarding so the Pi forwards packets:
echo 'net.ipv4.ip_forward = 1' | sudo tee -a /etc/sysctl.d/99-tailscale.conf
echo 'net.ipv6.conf.all.forwarding = 1' | sudo tee -a /etc/sysctl.d/99-tailscale.conf
sudo sysctl -p /etc/sysctl.d/99-tailscale.conf
Now approve the subnet route in the Tailscale Admin Panel – this is often forgotten. Go to login.tailscale.com/admin/machines, click on the Pi, “Edit route settings”, and enable the displayed route.
Two more things for continuous operation:
Disable key expiry: Tailscale keys expire by default after 180 days. For a headless machine like the Pi, this is impractical. In the Admin Panel, click on the Pi → “Disable key expiry”.
Check autostart: Tailscale sets itself up as a systemd service and starts automatically. To be safe:
sudo systemctl status tailscaled
sudo systemctl enable tailscaled
Step 3: Tailscale on the Client
Install Tailscale on the device you want to operate from:
- Windows/Mac/Linux: Download from tailscale.com/download
- Android/iOS: App from the respective store
Log in with the same account as the Pi. Then enable “Accept Routes” so the subnet routes from the Pi arrive. On Windows, you’ll find this in the Tailscale settings (System Tray). On Linux:
sudo tailscale up --accept-routesOn macOS, look for “Allow Subnet Routes” or similar in the Tailscale preferences.
With this, your client can see the subnet of your shack – including the IC-705.
Step 4: Connect Client Software
The tunnel is up – now you just need the software to operate the radio. I’ll show two variants here: wfview on PC and SDR Mobile on iPhone/iPad. The principle is the same for both: you use the local IP of the IC-705 (not a Tailscale IP), because the subnet router forwards traffic transparently. For the client software, it looks like you’re on the local network.
Option A: wfview (Windows / Mac / Linux)
Start wfview and enter in the connection settings:
- Radio IP: The local IP of the IC-705, e.g.
192.168.1.50 - Control Port:
50001 - Username/Password: As configured on the IC-705
For me, this runs stably – from the office, on the go, even over mobile data. Waterfall, audio, PTT, everything works.
Option B: SDR Mobile (iOS)
If you prefer to operate with your iPhone or iPad, you can use SDR Mobile by Marcus Hardt (DL8MX). The app supports the IC-705 (and other Icom radios) natively over the network and offers a waterfall, audio, and control directly on the mobile device.
Prerequisite: Tailscale must be installed on the iPhone/iPad and logged in with the same account.
In SDR Mobile then:
- Add new radio → Icom IC-705
- IP Address: The local IP of the IC-705, e.g.
192.168.1.50 - Username/Password: As configured on the IC-705
- Connect – done
Here too: SDR Mobile connects via the Tailscale tunnel to the local IP and notices no difference from being on Wi-Fi at home. Especially great for on the go – iPad in the backpack, headphones on, and you have your shack with you.
Other Software
Icom’s RS-BA1 works over the tunnel just as well. If you have the software, you can keep using it. Basically, any software that can access the IC-705 over the network will work – the Tailscale tunnel is transparent.
Troubleshooting
If it doesn’t work right away, here are the most common causes:
“Connection refused” or Timeout
- Subnet route approved in the Admin Panel? (Most common error.)
- IP forwarding active on the Pi? Check with:
cat /proc/sys/net/ipv4/ip_forward– must be1. - “Accept Routes” enabled on the client? On Linux:
tailscale statusshould show the subnet route.
High Latency
Check whether the connection is direct or going through a relay (DERP):
tailscale ping <IP-of-Pi>“via DERP” means relay – slower, but often only temporary. Tailscale builds a direct connection in the background. Persistent DERP indicates a restrictive network (e.g., corporate Wi-Fi blocking UDP).
Audio Stuttering
- Reduce sample rate in wfview (8000 Hz)
- Check if peer-to-peer is active
- Ethernet connection on the Pi stable?
ping -c 20 192.168.1.50should show no packet loss
IC-705 Wi-Fi Disconnects
Happens occasionally, especially in power save mode. Assign a fixed IP in the router, and check if Power Save is active on the IC-705. A periodic ping from the Pi can help keep the connection alive:
# In the Pi's crontab:
*/5 * * * * ping -c 1 192.168.1.50 > /dev/null 2>&1
Tailscale Key Expired
If it suddenly stops working after months: Check in the Admin Panel whether the key has expired. Disable key expiry (see above).
Security
Tailscale encrypts all communication end-to-end with WireGuard. Only devices in your Tailnet can communicate with each other. This is fundamentally more secure than open port forwarding with DynDNS, where the IC-705 control ports would be accessible to anyone.
Still, a few recommendations:
- Set a strong password on the IC-705
- 2FA on your Tailscale account – your identity provider (Google, GitHub, etc.) usually handles this already
- Tailscale offers ACLs that let you define which device can access which IPs/ports. Useful if you only want to expose the IC-705 and not the entire subnet.
- Use the Tailscale sharing feature with caution
Other Ways to Get There
As mentioned at the beginning: Tailscale + Raspberry Pi is one option, but not the only one. Here are a few alternatives that may be better suited depending on your situation:
- WireGuard on a VPS: More control, no dependency on a third party. But you have to maintain the VPS yourself, and the configuration is more complex. For people who are comfortable with Linux administration, a very good option.
- ZeroTier: Similar concept to Tailscale, also peer-to-peer and CGNAT-capable. Free for up to 25 devices. Some prefer it because it’s fully self-hostable.
- Public IP + Port Forwarding: If your ISP offers a public IPv4 (possibly for an extra fee), this is the most direct way. Then you don’t need a tunnel or an intermediary machine. Security-wise, you should put a firewall and ideally a VPN in front of it.
- Instead of Raspberry Pi: Any machine that can run Tailscale (or WireGuard, or ZeroTier) works as a gateway. A mini PC, a NAS, an old laptop – whatever is available and can run continuously.
There’s no single right solution. It depends on what you already have, how much you want to configure, and whether CGNAT is an issue for you or not.
Conclusion
For me, Tailscale + Raspberry Pi has proven to be a straightforward way to operate the IC-705 remotely. Once set up, it runs stably and requires little maintenance. I use it regularly from the office and on the go, and it works well.
The concept isn’t limited to the IC-705. Any Icom with KNS (Network Control) – IC-7610, IC-9700, IC-905, IC-R8600 and others – can be remote-controlled this way. With those radios, you just plug in an Ethernet cable instead of using Wi-Fi, but the principle is identical. I don’t have an IC-9700 myself, but I hear from other OMs that the setup works the same there – so if you want to run your 2m/70cm station remotely, you can apply this 1:1.
What interests me next: Combining this with OpenWebRX (no local QSO can be overheard by others :D) to have a parallel WebSDR access. But that’s material for another article.
Questions? You can find me on oeradio.at or via QRZ under OE8YML.
73 de OE8YML